
LIFE CASTING
The following is a description of the steps required
for the creation of a life cast:
( The use of the products and procedures mentioned is at the risk of the user!)
Step 1: Life Casting. (Full Head)
    Supplies needed:  Acucast (or dental alginate),
 Ultracal 30, plaster bandages, bald cap,  Vaseline,
 surgical gloves (optional), bucket of clean water, and a
 bucket of water for washing.
Before you begin:
Organize your work area, make sure everything you need is within reach. cut the plaster bandages
(I use bandages that are 6' wide) as follows:
Four 36 inch lengths folded twice along it's length so that its length is still 36 inches but it is four times as thick.(the length may vary according to the size of the subject)
Four 24 inch lengths folded in the same manner as above.
Numerous 18 inch lengths folded twice. This time when you are done folding, the bandages should be four layers thick and rectangular shaped pads. (the number of bandages varies again depending on the size of your subject)
pre-measure acucast or alginate and water.
|
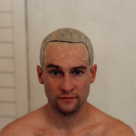
Procedure: Apply bald cap. Apply a thin layer of Vaseline to all facial hair, including eyelashes.
|
|
|
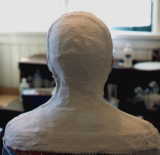
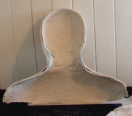
The cast is applied in two parts, front and back. The back is done first by applying one of the 36 inch lengths of bandage (closed side of fold forward) starting at the point of either shoulder, up the neck, behind the ear, over the top of the head midway, and finally down the other side to the point of the opposite shoulder in the same fashion. Then apply one of the 24 inch lengths from one shoulder, across the back to the other shoulder, over lapping the ends of the first bandage. This defines the border between the front and the back halves and also the bottom edge of the cast. now, fill in the back area with the pads of bandage, making sure to over lap each slightly to increase the strength of the cast. Then apply the second 36 inch bandage over the top of the head, behind the ears to the points of the shoulders. Repeat the same for the 24 inch bandage behind the back.
|
|
|
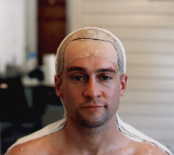
Once the first half has set a bit, (dry to the touch) apply a thin layer of Vaseline to the front border and back about 3 inches. This ensures that the front and back halves do not fuse together. Apply another 36 inch bandage to the front (closed side of the fold facing back this time) so it buts up against the back half. Run it behind the ears.
At this point you should make sure the ears are still in their natural position or else the finished bust's ears will not be the same as the subject's. Then you apply another 24 inch bandage across the chest as you did the back.
|
|
|
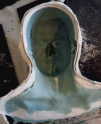
Now the fun part. The application of the acucast. First put cotton in the subjects ears, or better yet have the subject put it in before you begin the life cast process. Mix the pre-measured acucast and water, always add powder to water. You can do this either by hand with a wooden spoon or a mixer. If you do it by hand it must be done very vigorously. Now you must act quickly, the acucast sets in about 5-8 minutes and if you are using alginate in about 3-5 minutes depending on temperature. The warmer the water, the faster it sets. I find that about 70 degrees F. is about right. Start by applying the acucast around the eyes and nostrils. Care should be taken to leave the nasal passages clear for obvious reasons, and make sure there are no air pockets in the corners of the eyes.
This is very important to the fit of the final appliance! Now cover the rest of the face. And finally overlap the 36 inch bandage that defines the front half not all the way though. Overlap about half it's width, you'll understand why in a bit. Do the same with the 24 inch bandage across the chest.
Once the acucast is set apply the remaining 36 inch bandage across the top of the head again except this time overlap the back cast by about 3/4 to 1 inch. Apply the final 24 inch bandage across the chest. This locks the acucast into place making it less likely to separate from the cast when removing. Now cover the rest of the acucast with the pads of bandage like you did for the back.
|
|
|
When the cast is set, aprox. 5-10 minutes have the subject support the front half of the cast with their hands and have them lean forward. Get them to wrinkle their face in order to loosen the acucast and then gently pull the front half away. Then remove the back half. The two halves should fit snugly together. Now blot any moisture away from the acucast and then secure the two halves together with mould straps or duct tape. If you use duct tape USE LOTS! When I did this cast I didn't use enough and when I poured the Ultracal it began to split apart! I stood there wondering why the level of Ultracal was getting lower.(duh!)
But with fast action and help from Mur, the subject, we were able to salvage the operation.
|
|
|
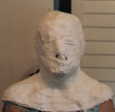
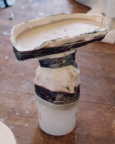
Now invert the cast in a five gallon bucket. (the bucket in the photo is not a 5 gallon bucket but a much smaller one. The small bucket was Mur's quick thinking in the confusion of the above disaster. It was just the right size that when the head of the cast was wedged in, it supported the weight of the Ultracal thus keeping the two halves together, thumbs up Mur!)then mix enough Ultracal to fill the cast. Pour in the Ultracal and let it cure. This
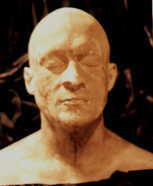
should take 4-5 hours. After the Ultracal is done going through it's hot and cold phases remove the bandages and acucast.
|
|
For a different perspective on this life casting method go to where I discovered it. It is posted on the tips & techniques page.
SAPSEMA
(main page)(methods)
(other peoples work)(suppliers)
(links)(books,videos)(web rings)(photos)(e-mail)